New Year's Eve 2009 in Seattle

So, I haven't had much time to scrapbook since school started.  Sad day!  However, to keep from biting my nails last night during the game, I created a few pages from our honeymoon in Seattle.  These are from New Year's Eve.

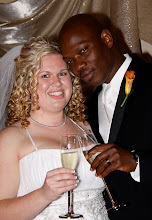
During the day, we went on a tour of Chateau St. Michelle's winery and did a small wine tasting.  It was our first trip to a winery and we enjoyed it.  I didn't know so many small details went into wine making (down to the color of the wood of the barrel the wine is stored in).  The first photo is of Theo and I standing outside the winery in front of a huge wine barrel.  The second is at the end of the tour, at the wine tasting, in front of their Christmas tree.

For this page I wanted an elegant and simple background.  I found this teal ribbon in my collection that I thought set off the color well.  Went I went to look for a bow to add some polish to the intersection of the two ribbons.  To my surprise, I had a bow that had the same look as the ribbon. (obviously from the same kit)  I wanted to add a caption so I found an elegant tag.  This tag was originally mint green but I filled it in with a teal to match the ribbon.

After a nap, we walked to the space needle to see the fireworks and ring in 2010.  It was our first New Year's Eve married (of course) so we were excited to spend it in an original way!  But it sure was cold.  Theo kind of looked like a homeless man.  Haha.

For both pages I wanted the same background to unite them.  I went for black to make it more "night like."  The first page is before midnight.  The needle was lit up beautifully.  We had to capture ourselves in front of the needle of course.


I used Gold letters to set off the black.  These are individual letters I placed to capture the moment.  Fireworks haven't started yet but the page was missing something.  The gold starburst adds just what it needed.  It even kind of preludes the fireworks to come.

The second page is just used to highlight the firework show that started at midnight.  I have never seen anything so spectacular.  It took me forever to get my camera to the best setting but I think I got a few good shots.  My favorites are the two on the right side of the page.

I hope we have another midnight celebration that is so memorable.  In the mean time, I won't hold my breath.  So...Welcome to 2010....almost 2 years too late.

Overlooking Seattle; Kerry Park

Day three in Seattle we made a visit to Kerry Park.  This was mainly a place for apartment dwellers to walk their dogs.  However, Kerry Park offers the AH-MAY-ZING veiw of Seattle downtown.  It was simply beautiful.  It was raining but we spent quite a while staring off at the view and being quite silly in the sculpture.  Did I mention that it was beautiful?!

To make this page I used round frames.  I love the way a round frame gives me a large enough picture to enjoy but also enough empty space on the page to fill with "stuff" that I can have fun with trinkets and journaling strips; as I did here with the strip "held in place" with the flower stamp and a button in the center.  To get the pictures in the round frame I select the layer that is the picture.  With the frame in place and on top, I erase that layer around the frame.  Using layering, I can erase and not worry about erasing the frame at all.  I need to find more frames that are circles so I can do this more often.

The second page I made for Kerry Park uses another erasing technique that I have been wanting to find the right pictures and layout to use.  For this page, I actually put the background ON TOP of the photos.  I used the eraser to erase only the background layer so that my photos would show through the space that I erased.  I have tried this a few times before but I never saved those pages because I was never happy with the effect.  This time, I like how it came out.  I used a word stamp at the bottom left to fill empty space and dedicate my affection for my husband.  (gosh that is mushy...shake it off, shake it off).  A journaling tag in the top right hand corner completes the page.

I hope you are enjoying seeing bits of our honeymoon in Seattle as much as I am enjoying sharing these scrapbook pages.  If anyone is reading that is.  haha

Museum of Flight - Modern Day Planes

Still day 1 in Seattle, we visited the Museum of Flight.  The outside area (which we visited first because it was about to rain) had a few planes you could actually go on and check out the inside.  We got on a British plane and JFK's Air Force One.  It a lot of American Airlines planes.  The most amazing plane was the HUGE Boeing 747.  I sure do wish we could have gone on a tour through the Boeing 747.

The first page shows the Air Force One and the British Airlines plane.  I staggered them and separated them so I could use individual letters to spell "Museum of Flight."  I used little airplane "stickers" to "hold down" the pictures.  The aqua of the background gives the appearance of the sky.

Theo really want to become the first non-United States Born President.  Since this would take a change of the United States' Constitution, he had to settle for the world of make believe.  He couldn't wait to get a picture of him coming out of Air Force One, waving like the president does.  We worked hard for this picture because, well, Yankees are rude and kept walking in front of us.  Haha, that would have never happened in the South.

This page, I kept simple to highlight the photo itself; since it is so special to Theo.  I used a more elegant background and journal tag to get the spirit of Theo's presidential term (haha).  The swirl corners were used to boarder the photo.  The page looked plain when I was finished so I added a vertical and horizontal stitching to add to the page.  I pushed them each towards the edge so the intersection would be off center.

The last page I'm sharing here displays the large American Airlines plane and the GIGANTIC Boeing 747.  I was almost literally looking straight up to get this picture.  I've never seen anything so big (That's what she said).  Theo, of course, needed to take a picture standing under the wing of the American Airlines plane.

On this page I used another blue theme for the reflection of the sky.  Again, I staggered and separated the pictures so I could use individual lettering between the two pictures.  I put cloud "stickers" on the corners of the pictures to act as double duty to "hold the pictures in place" and act as a background for the lettering.  Blue "gel" individual letters spell "giants" to highlight the extreme size of these planes.

The Seattle Underground Tour

On our first full day of our Seattle honeymoon we went on the Seattle Underground Tour in the morning.  That afternoon, we went to the Museum of Flight.  The pages I'm sharing today are a few of my favorites from the underground tour.

 The Seattle Underground Tour is just as it sounds.  The tour explains that originally Seattle was on a huge incline and sewage would literally run down the slope.  When a fire destroyed a lot of the city, they build the roads up so that the incline was not so steep.  I must say, this southern girl who is used to flat ground thought the incline was still VERY steep.  They built the streets up around the buildings that were still standing.  So a lot of the stores, lounges, etc, were below street level.

The first page shows a picture of a building pre-fire.  The streets after the fire were built up to the second level of the building.  At one point, we saw the original plumbing for a bathroom and it was about 5 feet up from where we were standing.  This page I kept simple; just putting a frame around the pictures and using a simple journaling strip.

The underground stores used "skylights" to let natural light shine into the store.  These skylights are literally built into the sidewalk.  This page shows the same skylight from the street level and the underground.  The purple glass shows up very pretty from the street level.  However, the skylights have not been maintained in the underground levels that are only used for the tour.  So they weren't so pretty from underground.

This page I used the same ribbon with a brass embellishment to create a layering effect with the pictures and the journaling strip.

At the end of the tour, there is an artifact "museum" and a gift shop.  The pictures and clipping of Seattle before and after the fire were shocking.  To see pictures of a major city burned to char is just crazy.  I couldn't believe a whole city could be destroyed by a fire that started in one building.

This page shows a SMALL collection of the pictures they had displayed of the fire.  I sized it to the width of the page so the picture would be the focus of the page.  I used individual letters to spell "Seattle fire."  To add interest, I put a locket and key hanging from the S and the e of Seattle.  I "erased" a piece of the loops so that the hanging effect would be more realistic.

On our walk back "home" from the tour, we saw a sculpture that caught our eye.  In fact, it may have been right outside of where we were staying....but I don't remember.  Anyway, I thought it would be funny if we had a picture of Theo "pushing" it across the ground.

I placed the picture on a diagonal and bordered it with a scalloped ribbon.  Under the picture I placed a journaling strip and a ribbon flower with a button center.

After we got back and ate lunch, we went to the Museum of Flight.  I will be working on the pages from the Museum of Flight this weekend.  Be watching for those pages coming soon.


Honeymoon Number 2 - Seattle

A housekeeping note....If you are running Internet Explorer 8, that is why the pictures are not showing up in my blog.  They do show up in Internet Explorer 7 and Firefox....

Second, I took a trip to Office Depot today to start printing these pages so that I can start building my books.  The pages look so good and were cheaper than I thought to print.  I'm very excited.

I began working on my Seattle Pages.  I'm sharing two of them today.  The first one shows our first night when we arrived in Seattle on December 29, 2009.  I couldn't help but take a picture of the mountains out of the window of the airplane.  When we arrived at Seattle, we explored the block around the building where we were staying.  We found a coffee shop called "Tully's" that had a nice atmosphere.  Theo ended up going here every morning for coffee and breakfast.

This page was kept simple.  I placed 3 pictures, framed in gold, on the left side. I journaled about Tully's on a tag and finished the page with individual brassy letters.

After we had our coffee, we enjoyed the courtyard outside of Tully's and our building.  It had a beautiful fountain and a beautiful view of the nighttime city lights and buildings.  We did not go too far; we just enjoyed the block.  The three pictures featured here are in front of the fountain.

Used a circle of "pearls" to frame the pictures.  I elongated the frames to make them oval shapped and "erased" the photos to match the shape of the frames.  I used a paisley shape to be a background for my text.  A simple text block was used to type the caption.

Originally, I had a different background but it didn't work with the elements.  Theo picked out this bright yellow one.  Since I had not flattened the image yet, I was able to change the background very easily.

I'll have more Seattle pages to share soon.  Some may even cameo our friend Mullins who was staying in Seattle and was a great tour guide and friend.  We find it humorous that we spent our second honeymoon with our friend...but we had been married for a few months at this point....  Haha.

Enjoy,


Last of the New Orleans Honeymoon

First of all, I have found that, for some reason, on some computers you can not see the pictures I'm posting.  They show up on some computers as long slivers for whatever reason.  If you click on those pictures, you will be able to see them in a new window.  FYI.  In the mean time, I'll try to figure out why some of us can see the pictures and some of you can not.

This page is one of my favorites.  It is of Theo in front of Jackson Square.  I used a "rustic" background.  I framed the picture with a delicate scrolling frame.  I used the flowers with the jeweled centers to pop the corners of the picture.  Last, individual silver lettering announces our location at Jackson Square.

The day we were here, just to the left of the frame of the picture, there were great street performers.  They were playing music and dancing.  It was just fun to watch.

The last page I am going to share from the New Orleans album is our trip to the WWII museum.  This museum was fabulous.  I want to go back now that they have expanded it (or when they're done if they're not done yet).  It was just so amazing to see all these artifacts and experience the reality of a war I've only heard about.

I did not intentionally use a background that looks like it is splattered with blood, but in hindsight it may have been appropriate.  I used a frame set that put 4 frames on the edges of the page.  Once i put the pictures of artifacts and such in the frames, I spelled WWII Museum with individual letters.  The center of the letters were beige so I filled them with a chocolate color to blend with the frames better.  After, the page still looked empty so I added two individual camel colored frames with pictures.

Up next; Seattle Honeymoon.


Honeymoon Book - New Orleans Chapter

I have been working on a book for Theo's and my honeymoons.  But, I may have said this already.  Anyway, I'm almost done with our New Orleans section and I wanted to share a few of my favorite pages I've made for this one.  These are just a few...not the whole thing.

I made a lot of pages for our day at the aquarium.  For all the aquarium pages, I used the same background to tie it all together.  For this page, I could not find a frame for the pictures that I liked for this page....So I made one.  I used a "ribbon" to piece together in a hexagon frame and put the pictures together in a random shape.  I spelled aquarium with individual silver/scroll letters and used a "marble" to fill in blank space.

The next page is a few of our pictures we took with the animal figures throughout the aquarium.  It was fun to just be silly.  We had many more pictures of these poses, but I had to select a few...

For this page, I found a cute scroll frame to stagger the pictures.  A zig-zag ribbon cuts the page in half.  On the right half of the page, I placed a blue note page with curled corners on two corners.  I used a staple embeleshment to create the image that I stapled the two corners that are not curled up.  On the note I added a text box to create the caption, "The Kid in Me!"  I thought it was an appropriate caption since we were truly enjoying the aquarium as a child would.

The last aquarium page I'll share...I promise.  This one displays a few pictures of Theo "playing" in the aquarium and one picture of us in the shark jaw.  Theo was funny when he was petting the skark.  He was so scared!  I'm sure he kept putting his hand in and pulling it out fast before he could touch it.  When he finally touched it, he couldn't believe the texture.

I matted these pictures with a gel shape I found that had a border that matched the background but the main part of the shappe was a bright contrast. I used blue gel letters to spell "explore" but the letters blended with the background too much.  So I put a sheer rectangle behind it to make the letters pop.  I used a tweed bow at a diagonal on the page to make it appear that the date tag is being held in place by the tail of the bow. 

This page marks the end of the aquarium section of the scrapbook.

The last page I'll share today is from our visit to the children's museum.  We enjoyed this but decided that this will be more fun to come back to once we actually have children.

For this page, I used a background similar to the matting on the last page of the aquarium section.  I did this because we went to this museum the same day.  So, I wanted some element to tie these pages together.  I used a stitching element to make it appear that the "bar" of photos was sewn on to the page.  I used individual multicolor felt letters to spell the title.  It bothered me a little that the randomness of the colors created a pattern in the word "museum" but was completely random in the word "children's."  However, I did not change the colors because I liked the character of it all and if it were real elements, I wouldn't be able to.  So, I left it as is for "authenticity."  I finished the page with a "gift tag" explaining our visit.

Enjoy,

Hodge Podge of Pages

The next 3 pages I made for our scrapbooks are random pages.

The first page I made was in memory of the snow Louisiana received on February 12, 2010.  Theo and I went to my mom's to enjoy the snow because he had to go to work that day.

To make this page I used a simple 3 photo idea.  I pused all the photos to the right of the page.  I liked the idea of separating two landscape photos with one portrait photo.  I embellished the photos with two snow flakes and a ribbon placed on top.  I used individual lettering on the left to identify the snow day.  I used an ice blue background to keep the wintery feel.

The next page I made was for a dinner and game night we had in February of 2011.  Our friend Mullins came to visit.  Theo made us African peanut chicken sauce to make into lettuce wraps.  After dinner we went to another friend's house to play Apples to Apples and The Game of Things with a few more friend.  A good time was had by all!

The layout for this page was set on a diagonal.  I used a retro circle background that just gave me the feel of a 70's dinner party.  I used a chalk board and a chalky color font to create the "menu."  I cornered it with bow embellishments in the corners to dress it up.  The two pictures I used were matted on a mustard colored floral mat.  I used gold brads to "tack" them down.  Two black and white elegant ribbons border the photos.

Last, I am working on a special book for Theo and my honeymoons.  That's right.  We got two.  Since I only got 3 days off for the wedding, we went on a "mini"honeymoon to New Orleans before taking our real honeymoon to Seattle over New Year.  This page is from the first day we were in New Orleans, the day after our wedding.  We just wanted to walk and find new things.  Well, we did.  We found a little block that had a bunch of VERY neat sculptures.  So, of course we played on them.

This is a pretty simple page.  I just found a random, fun background.  I randomly angled and placed the photos.  I really did not have much of a reason for the placement of any of them.  I used individual "pepple" lettering to note that we were at, what we called, the Sculpure Park.  I randomly staggered and waved the letters to keep with the random feel of the page.  I really like the way the letters are overlapped.

First Two Pages - For Theo

So, The first two pages I've made are really for Theo.

The first one is in memory of his Citizenship Ceremony in July 22, 2010.  He was very excited when he saw it.  It's pretty simple with small pictures in 3 of the 4 corners with a tweed bow.  The intentions behind the bow is to make it look like it is the bow that is attaching the picture to the page.  Same with the buttons on the text strip in the 4th corner.  The larger middle picture is "being held in place" with metal looking photo corners.

This day was a special day for us.  Theo became a United States citizen.  He was qualified for citizenship because of the 5th anniversary of him receiving his green card.  Just goes to show, you can become a citizen the legal way, with no help of marriage.

I got a little more creative with the second page I've made.  Theo hasn't seen this one yet because I just made it today.  It is to celebrate our 1st Wedding anniversary on October 23, 2010.  We went to the old state capitol and had a picnic on the levee.  It was a lot of fun and a nice way to spend the day.

This page has a 4 picture layout displayed at an angle.  I used a green round frame to "hold" all 4 photos.  In the middle I used individual letter stamps to note that is was our 1st anniversary.  From the second "n" I hung a ribbon/charm embellishment for "flair."

I must say, if any one is interested in doing digital scrapbooking, it is very VERY much fun!  I haven't spent any money on embellishments and I have a pretty large collection so far.  I have to stress the website, Digitals.  This is a site where everyday you dowload a piece of a kit for free until it builds the whole kit.  In addition, there is a section for sample downloads.  For free you can download samples of a few elements each.  They're not large, but they're free and there are a lot to choose from.  Check it out!!

A Return to an Old Hobby

So, way back when, I used to have a full version of Photoshop and I would create digital scrapbook pages.  I really enjoyed this, however, when I got a new computer, I couldn't find my Photoshop software to load it and none of my scrapbook elements made the transfer.

Yesterday I discovered Gimp (http://www.gimp.org/).  It is basically a free software download that does basically what Photoshop does....but it's free.  You can even get free brush downloads, something I haven't done....yet.

Today I hit up some digital scrapbooking sites to see what kind of free elements I could score.  I hit the MOTEHRLOAD!!!!  I spent the morning downloading kits and organizing elements in a way that made sence to my hyper-OCD mind.  I have folders, subdivided into folders.  Haha.  But I'm excited to begin creating pages!  But first, I wanted to share my favorite kits I downloaded.  I am just sharing my favorites; not all of the kits.  Keep in mind, the pictures are a compilation of every element included in the kit.

From Shabby Princess I got the following kits:


I actually got A LOT from Shabby Princess, but these are my favorites.

There are a lot of embellishments and alphabets I want to get from Free Digital Scrapbooking, but I haven't yet.  I got two of their mini-kits too.  One of them is below.  Also, if you sign up for the member newsletter, you get a members only download with each newsletter.  The download is a kit similar to the one here.


Also, if you sign up at Digitals, you get a free Welcome Kit as well as a daily download that will eventually be a complete scrapbooking kit.

Those are my favorites for now.  I can't wait to get to scrapbooking so I can share my pages here!


Powered by Blogger.

Followers

About Me

Back to Home Back to Top A Way To Remember. Theme ligneous by pure-essence.net. Bloggerized by Chica Blogger.